คอร์สโปรเจกต์: Flashcard
ในตอนนี้เราจะมาทำ Course Project ซึ่งเป็นโปรเจกต์หลักของคอร์สนี้กันครับ โปรเจกต์นี้มีชื่อว่า Flashcard (บัตรคำศัพท์) ซึ่งเป็นเครื่องมือที่เอาไว้ใช้สำหรับช่วยจำสิ่งต่างๆ เช่น คำศัพท์ภาษาต่างๆ
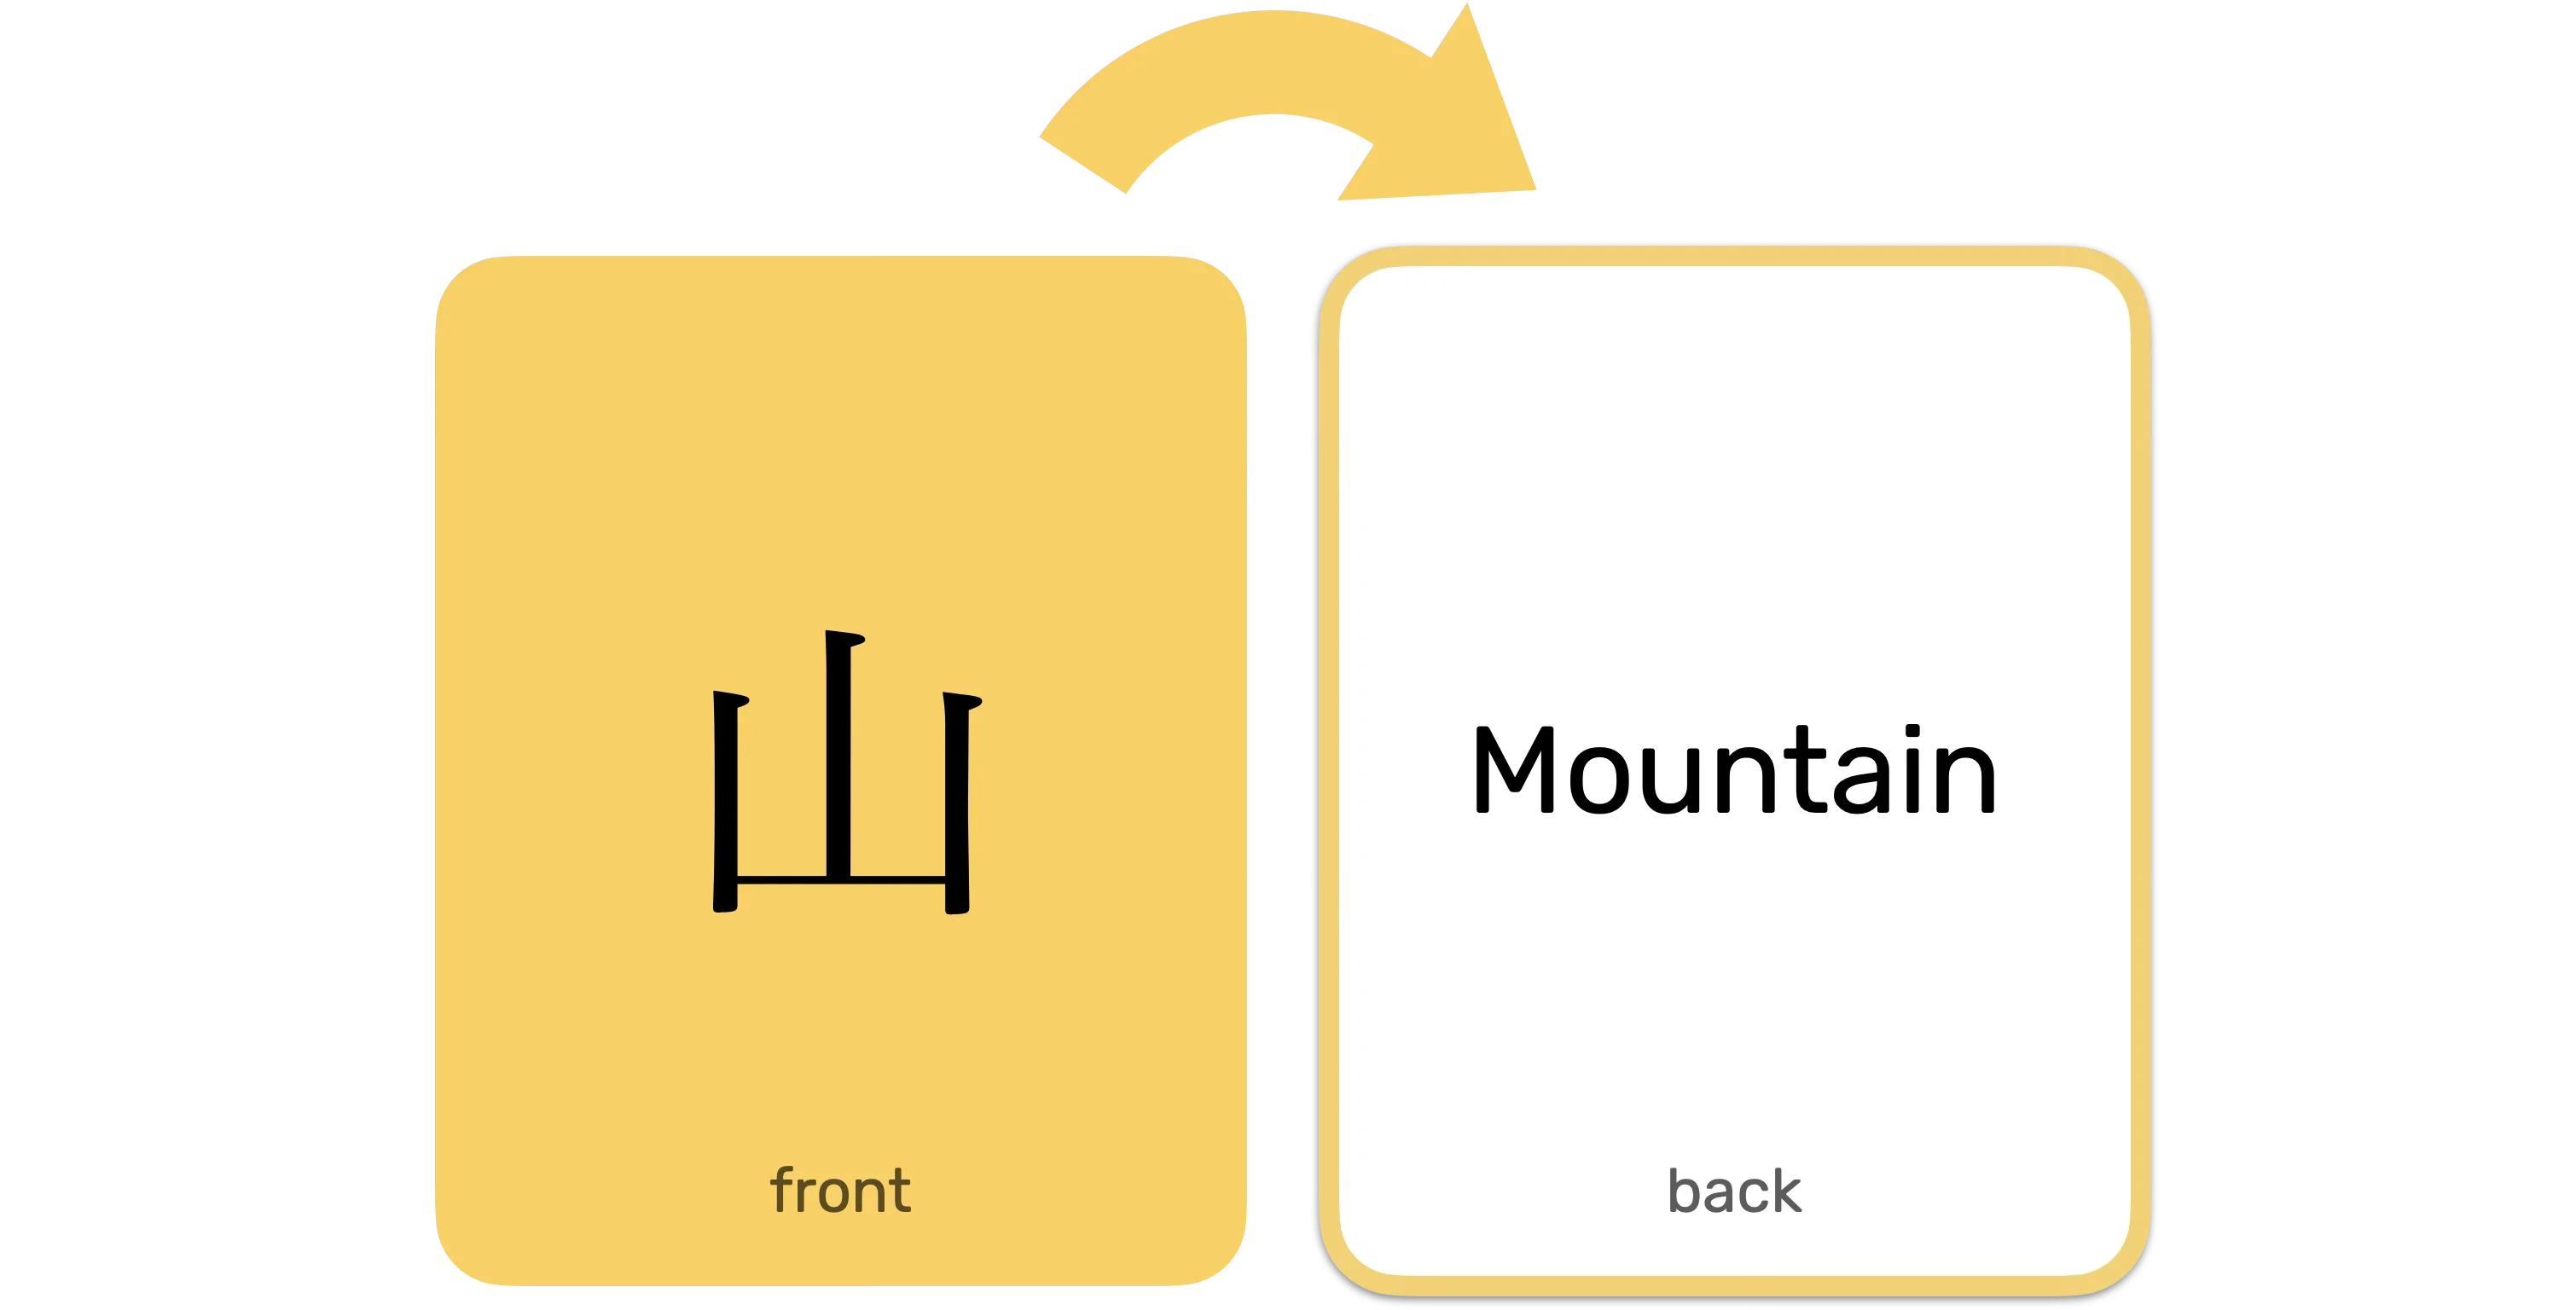
หลักการทำงานของโปรแกรมคือ จะมีการ์ดที่ด้านหน้าเป็นคำถาม (เช่น คำศัพท์ภาษาญี่ปุ่น) และด้านหลังเป็นคำตอบ (เช่น คำแปลภาษาอังกฤษ) โปรแกรมจะสุ่มคำถามขึ้นมา ให้เราลองนึกคำตอบ แล้วกดปุ่มเพื่อดูเฉลย
Demo
ตัวอย่าง:
ลองเล่นกับตัวอย่างข้างบนดู
- เมื่อเข้ามาในหน้าเว็บ โปรแกรมจะสุ่มคำถามมาให้
- ลองนึกคำตอบของคำศัพท์ที่เห็น
- กดปุ่ม “Reveal answer” เพื่อดูคำตอบ
- กดปุ่ม “Next question” เพื่อไปยังคำถามถัดไป
การออกแบบโปรแกรม
เพื่อให้เราสร้างโปรแกรมนี้ได้ง่ายขึ้น เราจะออกแบบโปรแกรมโดยการสร้างฟังก์ชันเล็กๆ ที่แต่ละฟังก์ชันมีหน้าที่ของตัวเอง แล้วนำมาประกอบกัน

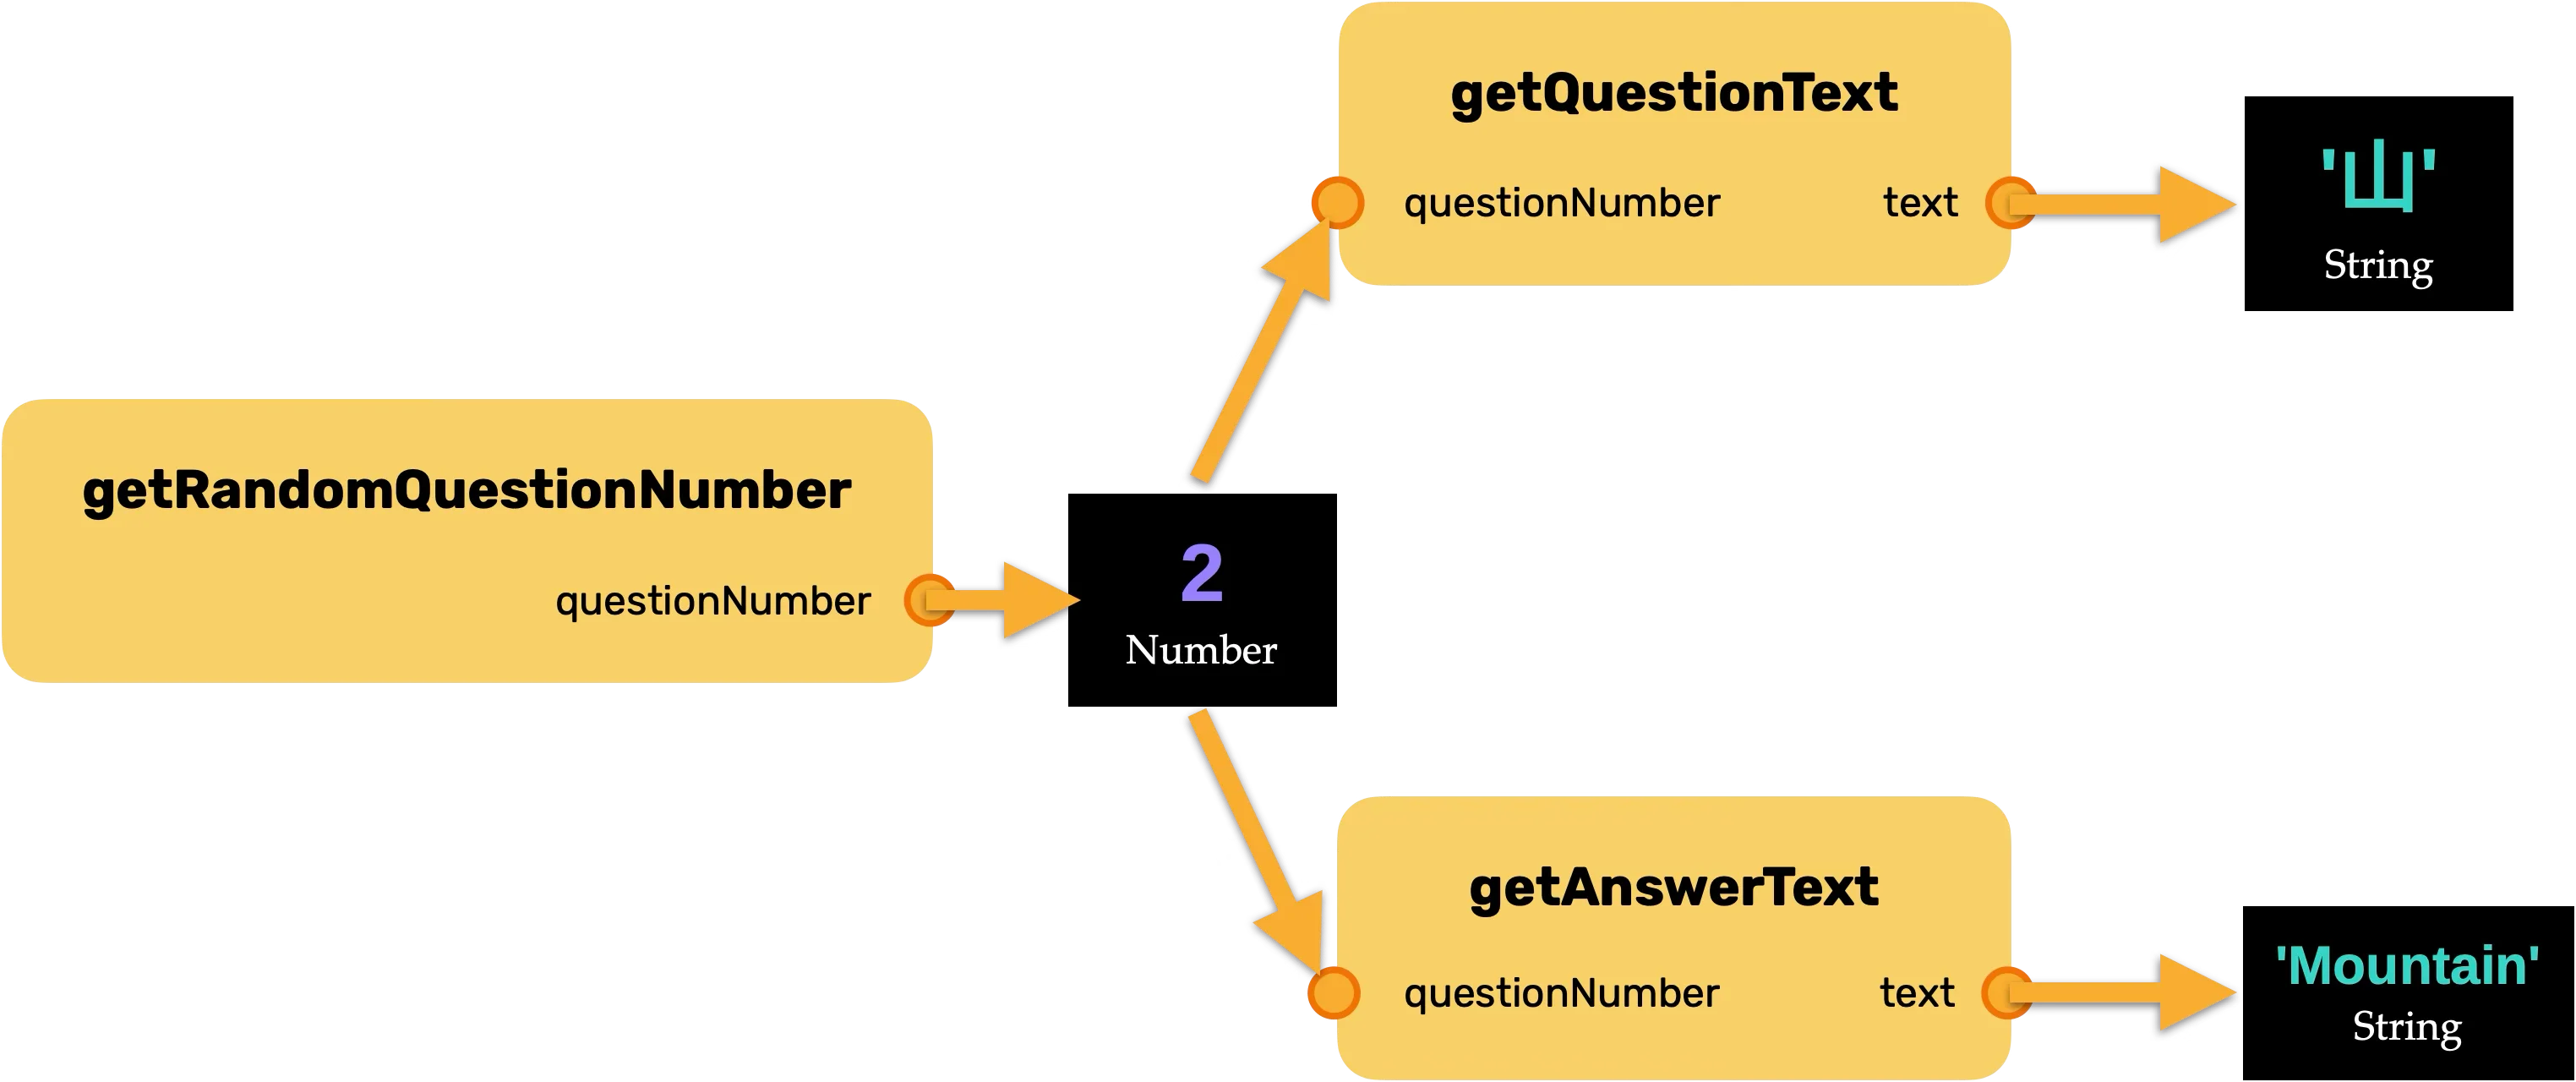
เราจะสร้าง 3 ฟังก์ชันหลัก:
getRandomQuestionNumber(): สุ่มหมายเลขคำถาม (สมมติว่ามี 10 ข้อ ก็จะสุ่มเลข 1-10)getQuestionText(questionNumber): รับหมายเลขคำถาม แล้วคืนค่าเป็นข้อความคำถามgetAnswerText(questionNumber): รับหมายเลขคำถาม แล้วคืนค่าเป็นข้อความคำตอบ
โค้ดตั้งต้น
เรามีโค้ดตั้งต้นให้ที่โปรเจกต์ hello-flashcard-starter บน GitHub ครับ
ในโปรเจกต์ตั้งต้นจะมีไฟล์ HTML และ script ที่จำเป็นเตรียมไว้ให้แล้ว
ขั้นตอนการเขียนโค้ด
1. สร้างฟังก์ชันสุ่มหมายเลขคำถาม
เราจะสร้างฟังก์ชัน getRandomQuestionNumber เพื่อสุ่มตัวเลข 1-10
let getRandomQuestionNumber = () => {
  // สุ่มเลขทศนิยมระหว่าง 0 ถึง 1 (ไม่รวม 1)
  let randomNumber = Math.random()

  // ทำให้ช่วงเป็น 0 ถึง 10 (ไม่รวม 10)
  randomNumber = randomNumber * 10

  // ปัดเศษลงให้เป็นจำนวนเต็ม (0-9)
  randomNumber = Math.floor(randomNumber)

  // บวก 1 เพื่อให้ได้ช่วง 1-10
  randomNumber = randomNumber + 1

  return randomNumber
}
เราสามารถรวมโค้ดทั้งหมดให้สั้นลงได้เป็น:
let getRandomQuestionNumber = () => {
  return Math.floor(Math.random() * 10) + 1
}
2. สร้างฟังก์ชันสำหรับดึงคำถามและคำตอบ
ต่อไป เราจะสร้างฟังก์ชัน getQuestionText และ getAnswerText โดยใช้ความรู้เรื่อง if...else if ที่เคยเรียนมา
// ชุดคำถามและคำตอบ (ตัวอย่าง 10 ข้อ)
// 1. 日 (Sun)
// 2. 月 (Moon)
// 3. 火 (Fire)
// 4. 水 (Water)
// 5. 木 (Tree)
// 6. 金 (Gold)
// 7. 土 (Earth)
// 8. 山 (Mountain)
// 9. 川 (River)
// 10. 雨 (Rain)

let getQuestionText = (questionNumber) => {
  if (questionNumber === 1) {
    return '日'
  } else if (questionNumber === 2) {
    return '月'
  }
  // ... ทำต่อไปจนครบ 10 ข้อ
}

let getAnswerText = (questionNumber) => {
  if (questionNumber === 1) {
    return 'Sun'
  } else if (questionNumber === 2) {
    return 'Moon'
  }
  // ... ทำต่อไปจนครบ 10 ข้อ
}
WARNING
การเขียนโค้ดแบบนี้ค่อนข้างยาวและไม่ใช่วิธีที่ดีที่สุด แต่เราจะใช้คอนเซปต์ที่เรียนมาแล้วไปก่อน แล้วจะกลับมาปรับปรุงโค้ดนี้ให้ดีขึ้นในบทเรียนถัดๆ ไปครับ
3. เชื่อม Logic เข้ากับ UI
ตอนนี้เรามีฟังก์ชันหลัก 3 ตัวแล้ว ที่เหลือคือการนำฟังก์ชันเหล่านี้มาเชื่อมต่อกับหน้าเว็บ (UI)
แสดงคำถามแรก:
js// หา element ต่างๆ จาก id let questionText = document.getElementById('questionText') let answerText = document.getElementById('answerText') // ... (หา element อื่นๆ ที่ต้องใช้) // สุ่มหมายเลขคำถามปัจจุบัน let currentQuestionNumber = getRandomQuestionNumber() // แสดงคำถาม questionText.innerText = getQuestionText(currentQuestionNumber)แนะนำ
.innerTextเราใช้
element.innerTextเพื่อกำหนดข้อความที่อยู่ภายใน element นั้นๆ ครับทำให้ปุ่ม "Reveal answer" ทำงาน:
เมื่อกดปุ่มนี้ เราจะซ่อนด้านหน้าของการ์ด (
front) และแสดงด้านหลัง (back) พร้อมทั้งแสดงคำตอบที่ถูกต้องjslet revealAnswerButton = document.getElementById('revealAnswer') let front = document.getElementById('front') let back = document.getElementById('back') revealAnswerButton.onclick = () => { // ซ่อนด้านหน้า front.hidden = true // แสดงด้านหลัง back.hidden = false // แสดงคำตอบ answerText.innerText = getAnswerText(currentQuestionNumber) }ทำให้ปุ่ม "Next question" ทำงาน:
เมื่อกดปุ่มนี้ เราจะซ่อนด้านหลัง แสดงด้านหน้า และสุ่มคำถามใหม่
jslet nextQuestionButton = document.getElementById('nextQuestion') nextQuestionButton.onclick = () => { // ซ่อนด้านหลัง back.hidden = true // แสดงด้านหน้า front.hidden = false // สุ่มคำถามใหม่และอัปเดต currentQuestionNumber = getRandomQuestionNumber() questionText.innerText = getQuestionText(currentQuestionNumber) }ข้อควรระวังเรื่อง Scope ของตัวแปร
สังเกตว่าใน
nextQuestionButton.onclickเราไม่ได้ใช้letประกาศcurrentQuestionNumberอีกครั้ง เพราะเราต้องการอัปเดตค่าของตัวแปรcurrentQuestionNumberที่อยู่ข้างนอกฟังก์ชัน หากเราประกาศด้วยletซ้ำ จะกลายเป็นการสร้างตัวแปรใหม่ที่มีขอบเขต (scope) อยู่แค่ในฟังก์ชันนี้เท่านั้น ซึ่งจะทำให้เกิดบั๊กได้
สิ่งที่ต้องปรับปรุง
ตอนนี้เราได้โปรแกรม Flashcard ที่ทำงานได้แล้ว แต่โค้ดของเรายังมีจุดที่สามารถปรับปรุงได้ โดยเฉพาะการเพิ่มคำถามใหม่ ซึ่งตอนนี้ทำได้ค่อนข้างยาก เพราะต้องแก้ไขโค้ดหลายจุด
ในบทต่อไป เราจะเรียนรู้คอนเซปต์ใหม่ๆ เช่น Array และ Object ที่จะช่วยให้เราปรับปรุงโค้ดนี้ให้ดีขึ้น จัดการข้อมูลได้ง่ายขึ้น และทำให้การเพิ่มคำถามใหม่ทำได้สะดวกกว่าเดิมครับ