การเขียนโค้ดเพื่อตรวจทานโค้ดของตัวเอง (Automated Testing)
ในตอนก่อนหน้า เราได้สร้างฟังก์ชันชื่อ
getGrade:ดูโค้ด
jslet getGrade = (score) => { if (score >= 80) { return 'A' } else if (score >= 70) { return 'B' } else if (score >= 60) { return 'C' } else if (score >= 50) { return 'D' } else { return 'F' } }เราทดสอบฟังก์ชันนี้โดยการเรียกใช้งานมัน ส่งอินพุตต่างๆ เข้าไป แล้วตรวจสอบดูว่าผลลัพธ์ถูกต้องหรือไม่
getGrade(100)"A"getGrade(90)"A"getGrade(80)"A"getGrade(75)"B"getGrade(64)"C"getGrade(53)"D"getGrade(42)"F"ทุกครั้งที่เราปรับปรุงโค้ด เราจะต้องทำการทดสอบใหม่อีกครั้ง เพื่อให้แน่ใจว่าเราไม่ได้ทำอะไรให้พัง นี่เป็นเรื่องน่าเบื่อมากหากเราต้องทำด้วยตัวเองทุกครั้ง ดังนั้นนักพัฒนาซอฟต์แวร์จึงใช้เทคนิคที่เรียกว่า automated testing (การทดสอบอัตโนมัติ) มาช่วยในเรื่องนี้
การทดสอบอัตโนมัติคืออะไร
การทดสอบอัตโนมัติ คือ การเขียนโค้ดเพื่อให้มันทดสอบโค้ดให้เรา เราจะได้ไม่ต้องทำการทดสอบด้วยตัวเองทุกครั้งที่เราแก้โค้ด
เราสามารถสร้าง test suite (ชุดทดสอบอัตโนมัติ) แบบง่ายๆ ได้ โดยการสร้างฟังก์ชันใหม่ขึ้นมา (ในตัวอย่างจะตั้งชื่อว่า
testGetGrade) ฟังก์ชันนี้จะเรียกใช้งานฟังก์ชันgetGrade()หลายๆ ครั้ง เพื่อส่งอินพุตต่างๆ เข้าไป และนับคะแนนตามจำนวนครั้งที่ฟังก์ชันgetGrade()คืนค่าที่ถูกต้อง หากคะแนนรวมเท่ากับจำนวนกรณีทดสอบ ให้ถือว่าการทดสอบผ่านjslet testGetGrade = () => { let correctCount = 0 if (getGrade(100) === 'A') { correctCount = correctCount + 1 } if (getGrade(90) === 'A') { correctCount = correctCount + 1 } if (getGrade(80) === 'A') { correctCount = correctCount + 1 } if (getGrade(75) === 'B') { correctCount = correctCount + 1 } if (getGrade(64) === 'C') { correctCount = correctCount + 1 } if (getGrade(53) === 'D') { correctCount = correctCount + 1 } if (getGrade(42) === 'F') { correctCount = correctCount + 1 } let totalCount = 7 if (correctCount === totalCount) { console.log(`✅ Score: ${correctCount}/${totalCount}`) } else { console.log(`❌ Score: ${correctCount}/${totalCount}`) } }testGetGrade()✅ Score: 7/7undefinedหากเราลองแก้ฟังก์ชัน
getGrade()ให้ทำงานผิดพลาด แล้วลองทดสอบอีกครั้ง ก็จะทำให้เราทราบได้ทันทีว่าต้องมีอะไรผิดพลาดตรงไหนสักที่jslet getGrade = (score) => { if (score >= 80) { return 'A' } else if (score >= 70) { return 'B' } else if (score >= 60) { return 'C' } else if (score >= 50) { return 'D' } else { return 'E' // แก้จาก 'F' เป็น 'E' } }testGetGrade()❌ Score: 6/7undefinedเราสามารถปรับปรุง “test runner” นี้ โดยทำให้มันรายงานว่ากรณีไหนที่ฟังก์ชันของเราให้คำตอบผิด
ดูโค้ด
jslet testGetGrade = () => { // เก็บจำนวนกรณีที่ไม่ถูกต้องแทน let incorrectCount = 0 // เช็คเฉพาะกรณีที่ไม่ถูกต้อง if (getGrade(100) !== 'A') { console.log('❌ getGrade(100) should be A') incorrectCount = incorrectCount + 1 } if (getGrade(90) !== 'A') { console.log('❌ getGrade(90) should be A') incorrectCount = incorrectCount + 1 } if (getGrade(80) !== 'A') { console.log('❌ getGrade(80) should be A') incorrectCount = incorrectCount + 1 } if (getGrade(75) !== 'B') { console.log('❌ getGrade(75) should be B') incorrectCount = incorrectCount + 1 } if (getGrade(64) !== 'C') { console.log('❌ getGrade(64) should be C') incorrectCount = incorrectCount + 1 } if (getGrade(53) !== 'D') { console.log('❌ getGrade(53) should be D') incorrectCount = incorrectCount + 1 } if (getGrade(42) !== 'F') { console.log('❌ getGrade(42) should be F') incorrectCount = incorrectCount + 1 } // หากไม่มีกรณีที่ผิด แสดงว่าทุกอย่างถูกต้อง if (incorrectCount === 0) { console.log('✅ All test cases passed') } }testGetGrade()❌ getGrade(42) should be Fundefinedอย่างที่เห็นไป การสร้าง test runner ใช้เองอาจต้องใช้เวลาและความพยายามอย่างมาก เพื่อให้ได้ประโยชน์จากมันอย่างเต็มที่ ดังนั้นนักพัฒนาซอฟต์แวร์จึงใช้สิ่งที่เรียกว่า testing framework มาช่วยในเรื่องนี้
Testing Framework
Testing framework เป็นชุดเครื่องมือที่ช่วยให้คุณสร้างชุดทดสอบได้สะดวกยิ่งขึ้น ในภาษา JavaScript มี Testing framework ให้เลือกใช้มากมาย อย่างเช่น QUnit, Mocha, Jasmine, Jest และ Vitest

Testing Framework ต่างๆ
- Jest เป็นเครื่องมือที่ได้รับความนิยมมากที่สุด (ข้อมูลจากปี 2022)
- Vitest เป็นเครื่องมือที่สร้างขึ้นมาในปี 2021 ซึ่งเป็นเครื่องมือที่ออกแบบมาสำหรับ JavaScript ในยุคใหม่ ซึ่งกำลังได้รับความนิยมเพิ่มขึ้นอย่างต่อเนื่อง
- QUnit เป็นเครื่องมือที่มีมาตั้งแต่ปี 2011 ใช้งานค่อนข้างง่ายสำหรับมือใหม่
ในตอนนี้เราจะยกตัวอย่างการใช้ QUnit ในการทดสอบ
Testing framework จะกำหนดรูปแบบวิธีการเขียนชุดทดสอบไว้ให้ ตัวอย่างเช่น ถ้าเราใช้ QUnit เราเขียนโค้ดแบบนี้:
jsQUnit.test('getGrade', (assert) => { assert.equal(getGrade(100), 'A') assert.equal(getGrade(90), 'A') assert.equal(getGrade(80), 'A') assert.equal(getGrade(75), 'B') assert.equal(getGrade(64), 'C') assert.equal(getGrade(53), 'D') assert.equal(getGrade(50), 'D') assert.equal(getGrade(49), 'F') assert.equal(getGrade(42), 'F') assert.equal(getGrade(0), 'F') })เมื่อทำการ run test จะได้ผลลัพธ์ดังนี้:
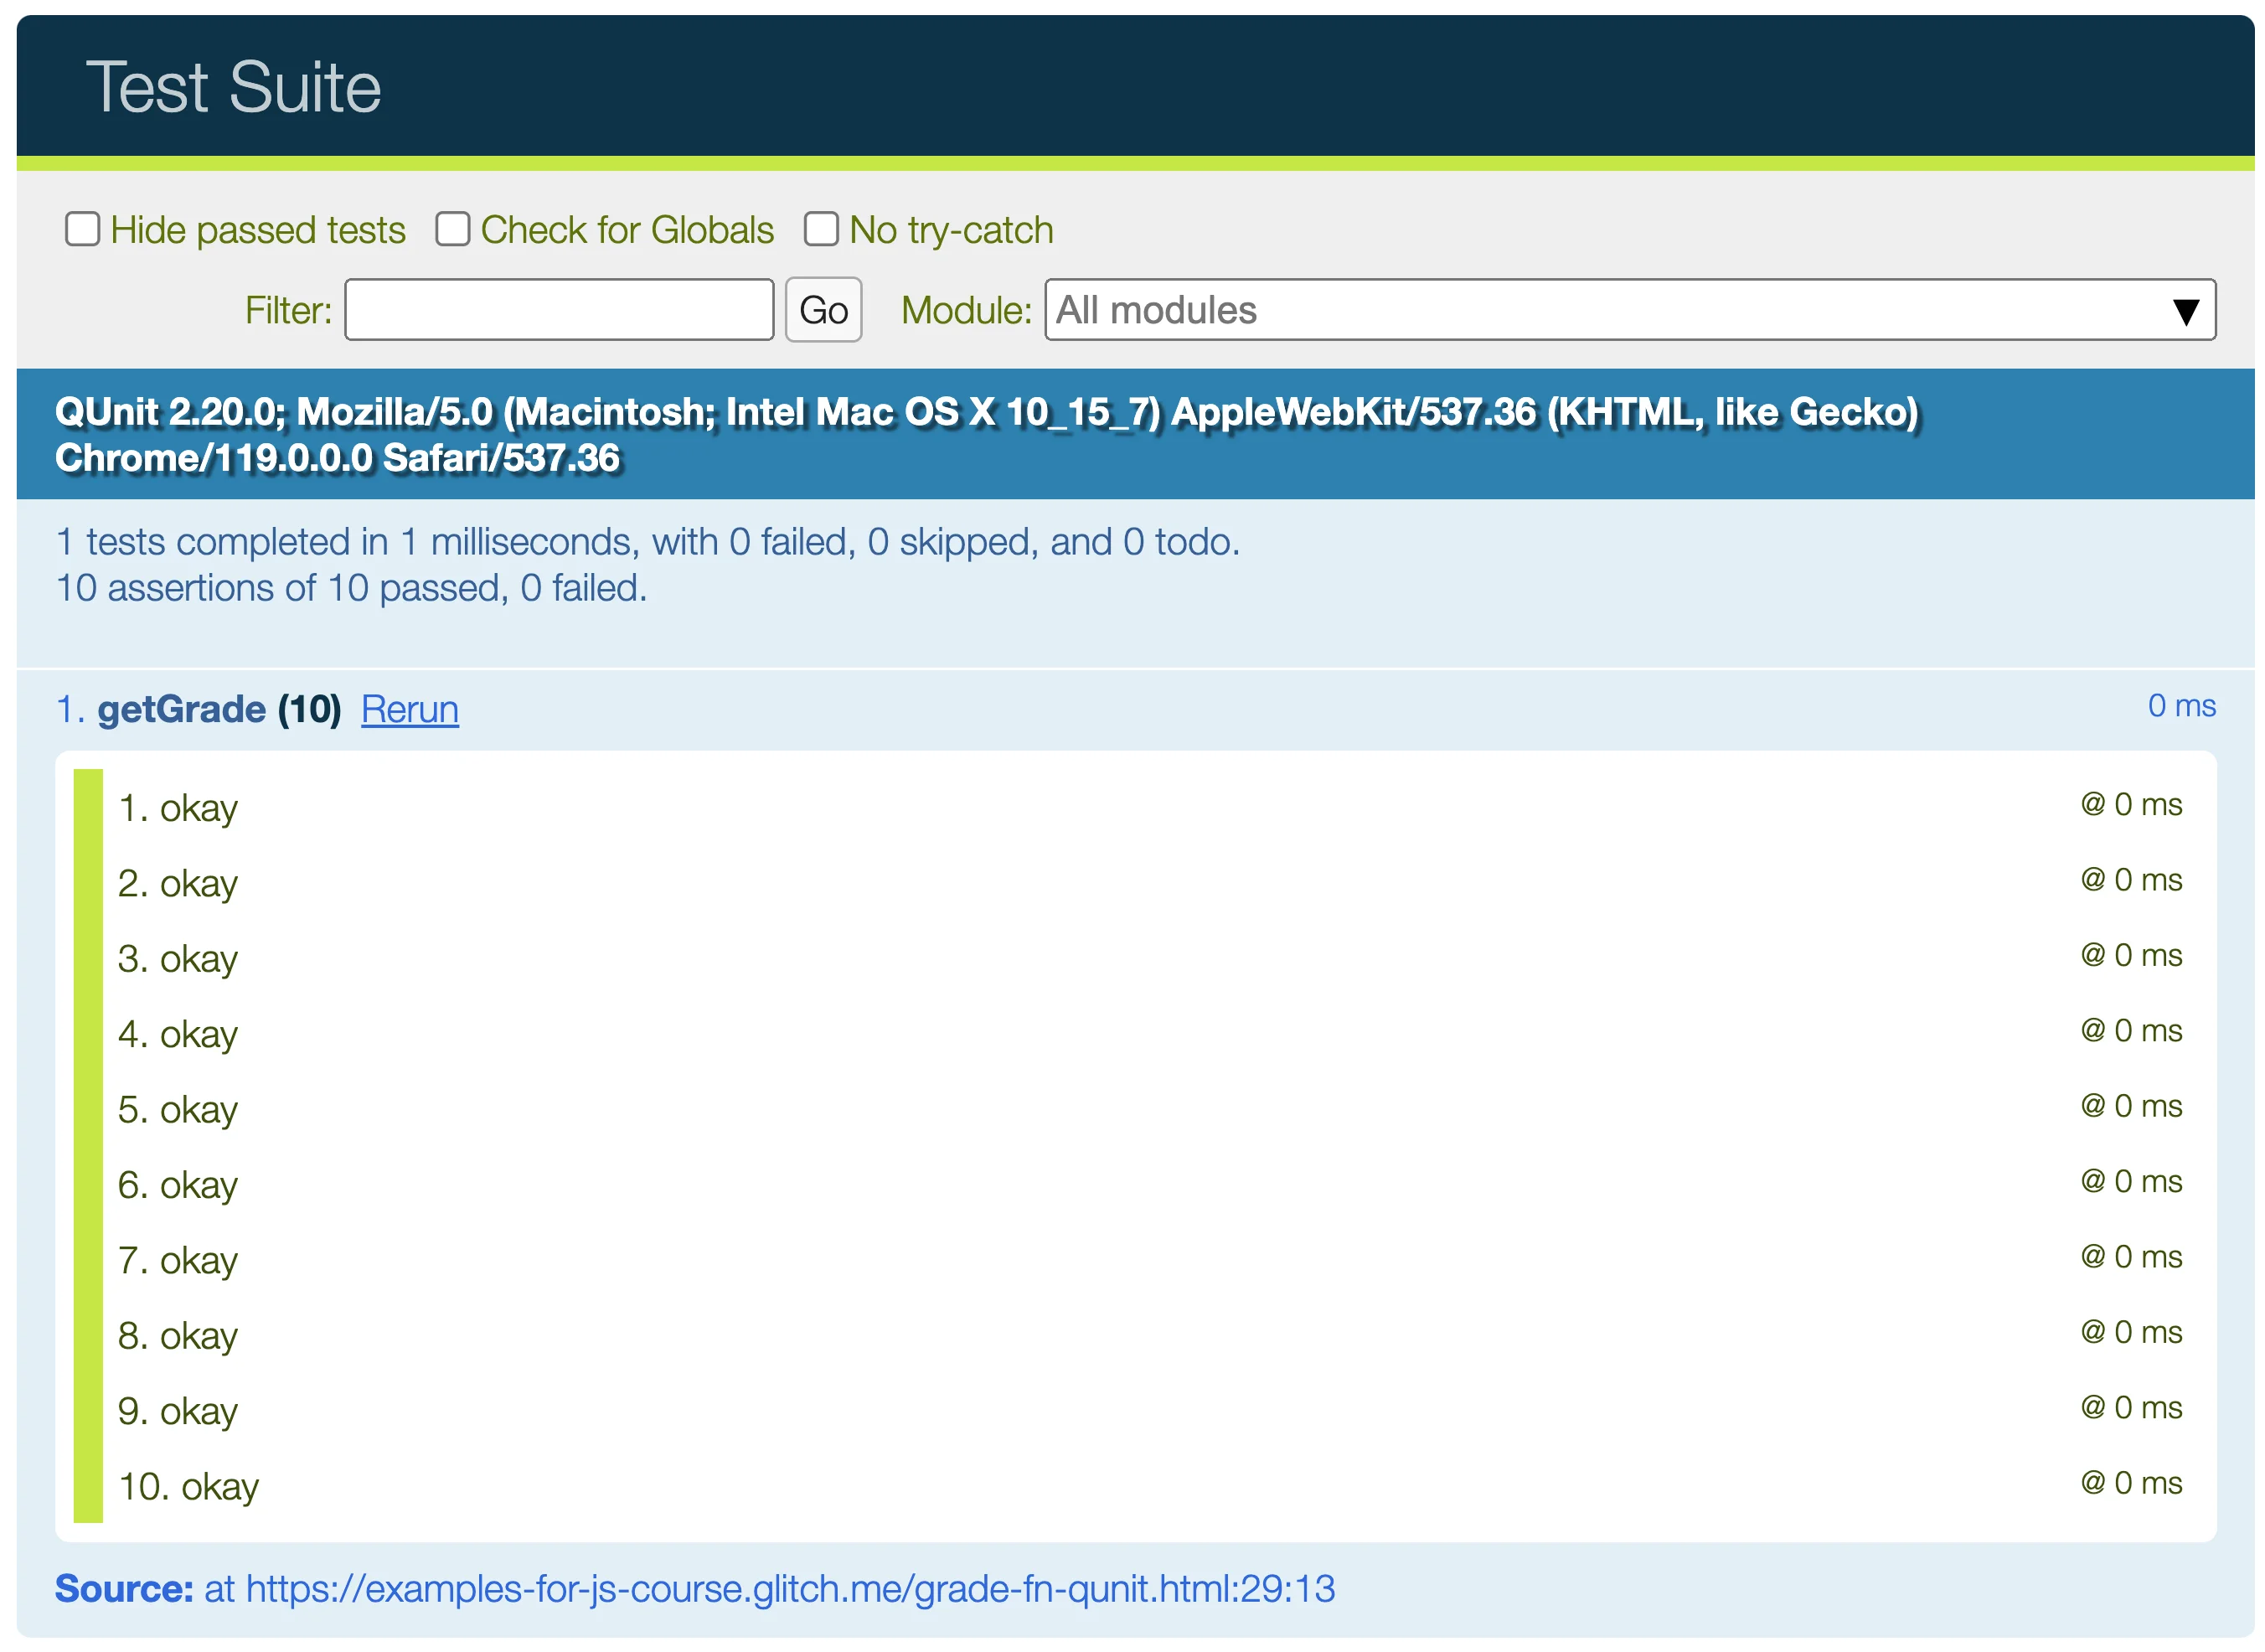
จะเห็นว่า QUnit สร้างหน้าเว็บเพื่อแสดงผลการทดสอบให้เราดูได้ง่ายๆ ด้วย และเมื่อมีกรณีที่ผิดพลาด ก็จะช่วยให้เราเห็นจุดที่ไม่ถูกต้องได้ง่ายและชัดเจน
ตัวอย่างการใช้ QUnit
เริ่มจากโค้ดเริ่มต้นนี้
html<!doctype html> <html> <head> <meta charset="utf-8"> <title>Test Suite</title> <link rel="stylesheet" href="https://code.jquery.com/qunit/qunit-2.20.0.css"> </head> <body> <div id="qunit"></div> <div id="qunit-fixture"></div> <script src="https://code.jquery.com/qunit/qunit-2.20.0.js"></script> <script> let add = (a, b) => { return a + b } QUnit.test('add 2 numbers', (assert) => { assert.equal(add(1, 2), 3) assert.equal(add(20, 30), 50) }) </script> </body> </html>สร้างโปรเจกต์ใน Glitch
สามารถทำตามได้โดยการ Remix โปรเจกต์นี้บน Glitch: https://glitch.com/~hello-qunit
จะได้ผลลัพธ์ดังนี้:
นำฟังก์ชัน
getGradeมาแทนที่ฟังก์ชันaddและเขียนชุดทดสอบใหม่เพื่อทดสอบฟังก์ชันgetGradeดูโค้ด
html<!doctype html> <html> <head> <meta charset="utf-8"> <title>Test Suite</title> <link rel="stylesheet" href="https://code.jquery.com/qunit/qunit-2.20.0.css"> </head> <body> <div id="qunit"></div> <div id="qunit-fixture"></div> <script src="https://code.jquery.com/qunit/qunit-2.20.0.js"></script> <script> let getGrade = (score) => { if (score >= 80) { return 'A' } else if (score >= 70) { return 'B' } else if (score >= 60) { return 'C' } else if (score >= 50) { return 'D' } else { return 'F' } } QUnit.test('getGrade', (assert) => { assert.equal(getGrade(100), 'A') assert.equal(getGrade(90), 'A') assert.equal(getGrade(80), 'A') assert.equal(getGrade(75), 'B') assert.equal(getGrade(64), 'C') assert.equal(getGrade(53), 'D') assert.equal(getGrade(50), 'D') assert.equal(getGrade(49), 'F') assert.equal(getGrade(42), 'F') assert.equal(getGrade(0), 'F') }) </script> </body> </html>ดูผลลัพธ์
ลองแก้ฟังก์ชัน
getGradeให้ทำงานผิดพลาดดูโค้ด
html<!doctype html> <html> <head> <meta charset="utf-8"> <title>Test Suite</title> <link rel="stylesheet" href="https://code.jquery.com/qunit/qunit-2.20.0.css"> </head> <body> <div id="qunit"></div> <div id="qunit-fixture"></div> <script src="https://code.jquery.com/qunit/qunit-2.20.0.js"></script> <script> let getGrade = (score) => { if (score >= 80) { return 'A' } else if (score >= 70) { return 'B' } else if (score >= 60) { return 'C' } else if (score >= 50) { return 'D' } else { return 'E' // แก้จาก 'F' เป็น 'E' } } QUnit.test('getGrade', (assert) => { assert.equal(getGrade(100), 'A') assert.equal(getGrade(90), 'A') assert.equal(getGrade(80), 'A') assert.equal(getGrade(75), 'B') assert.equal(getGrade(64), 'C') assert.equal(getGrade(53), 'D') assert.equal(getGrade(50), 'D') assert.equal(getGrade(49), 'F') assert.equal(getGrade(42), 'F') assert.equal(getGrade(0), 'F') }) </script> </body> </html>ดูผลลัพธ์
QUnit จะแสดงรายงานให้ดูว่ากรณีไหนที่ฟังก์ชันของเราให้คำตอบผิด
การทำ automated testing ช่วยให้เรามีความเชื่อมั่นในโค้ดของเรามากขึ้น
ครั้งหนึ่งผมเคยสร้างเกม Bemuse เป็นเกมแนวดนตรี เกมนี้สร้างด้วยโค้ดหลายพันบรรทัด และมี logic ต่างๆ ที่ซับซ้อนมาก โดยแต่ละเกม จะใช้เวลาเล่นประมาณ 2-3 นาที
ระหว่างที่ผมพัฒนาเกมนี้ เวลาผมแก้โค้ดจุดหนึ่ง ผมต้องการความมั่นใจ ว่าผมไม่ได้เผลอไปทำให้ส่วนอื่นๆ พัง ดังนั้นระหว่างที่พัฒนาเกม ผมจึงเขียน automated test ให้โค้ดชิ้นส่วนต่างๆ ไปด้วย ชุดทดสอบของเกมนี้ มีเทสต์อยู่ประมาณ 200 ข้อ ซึ่งใช้เวลารันไม่ถึง 3 วินาที
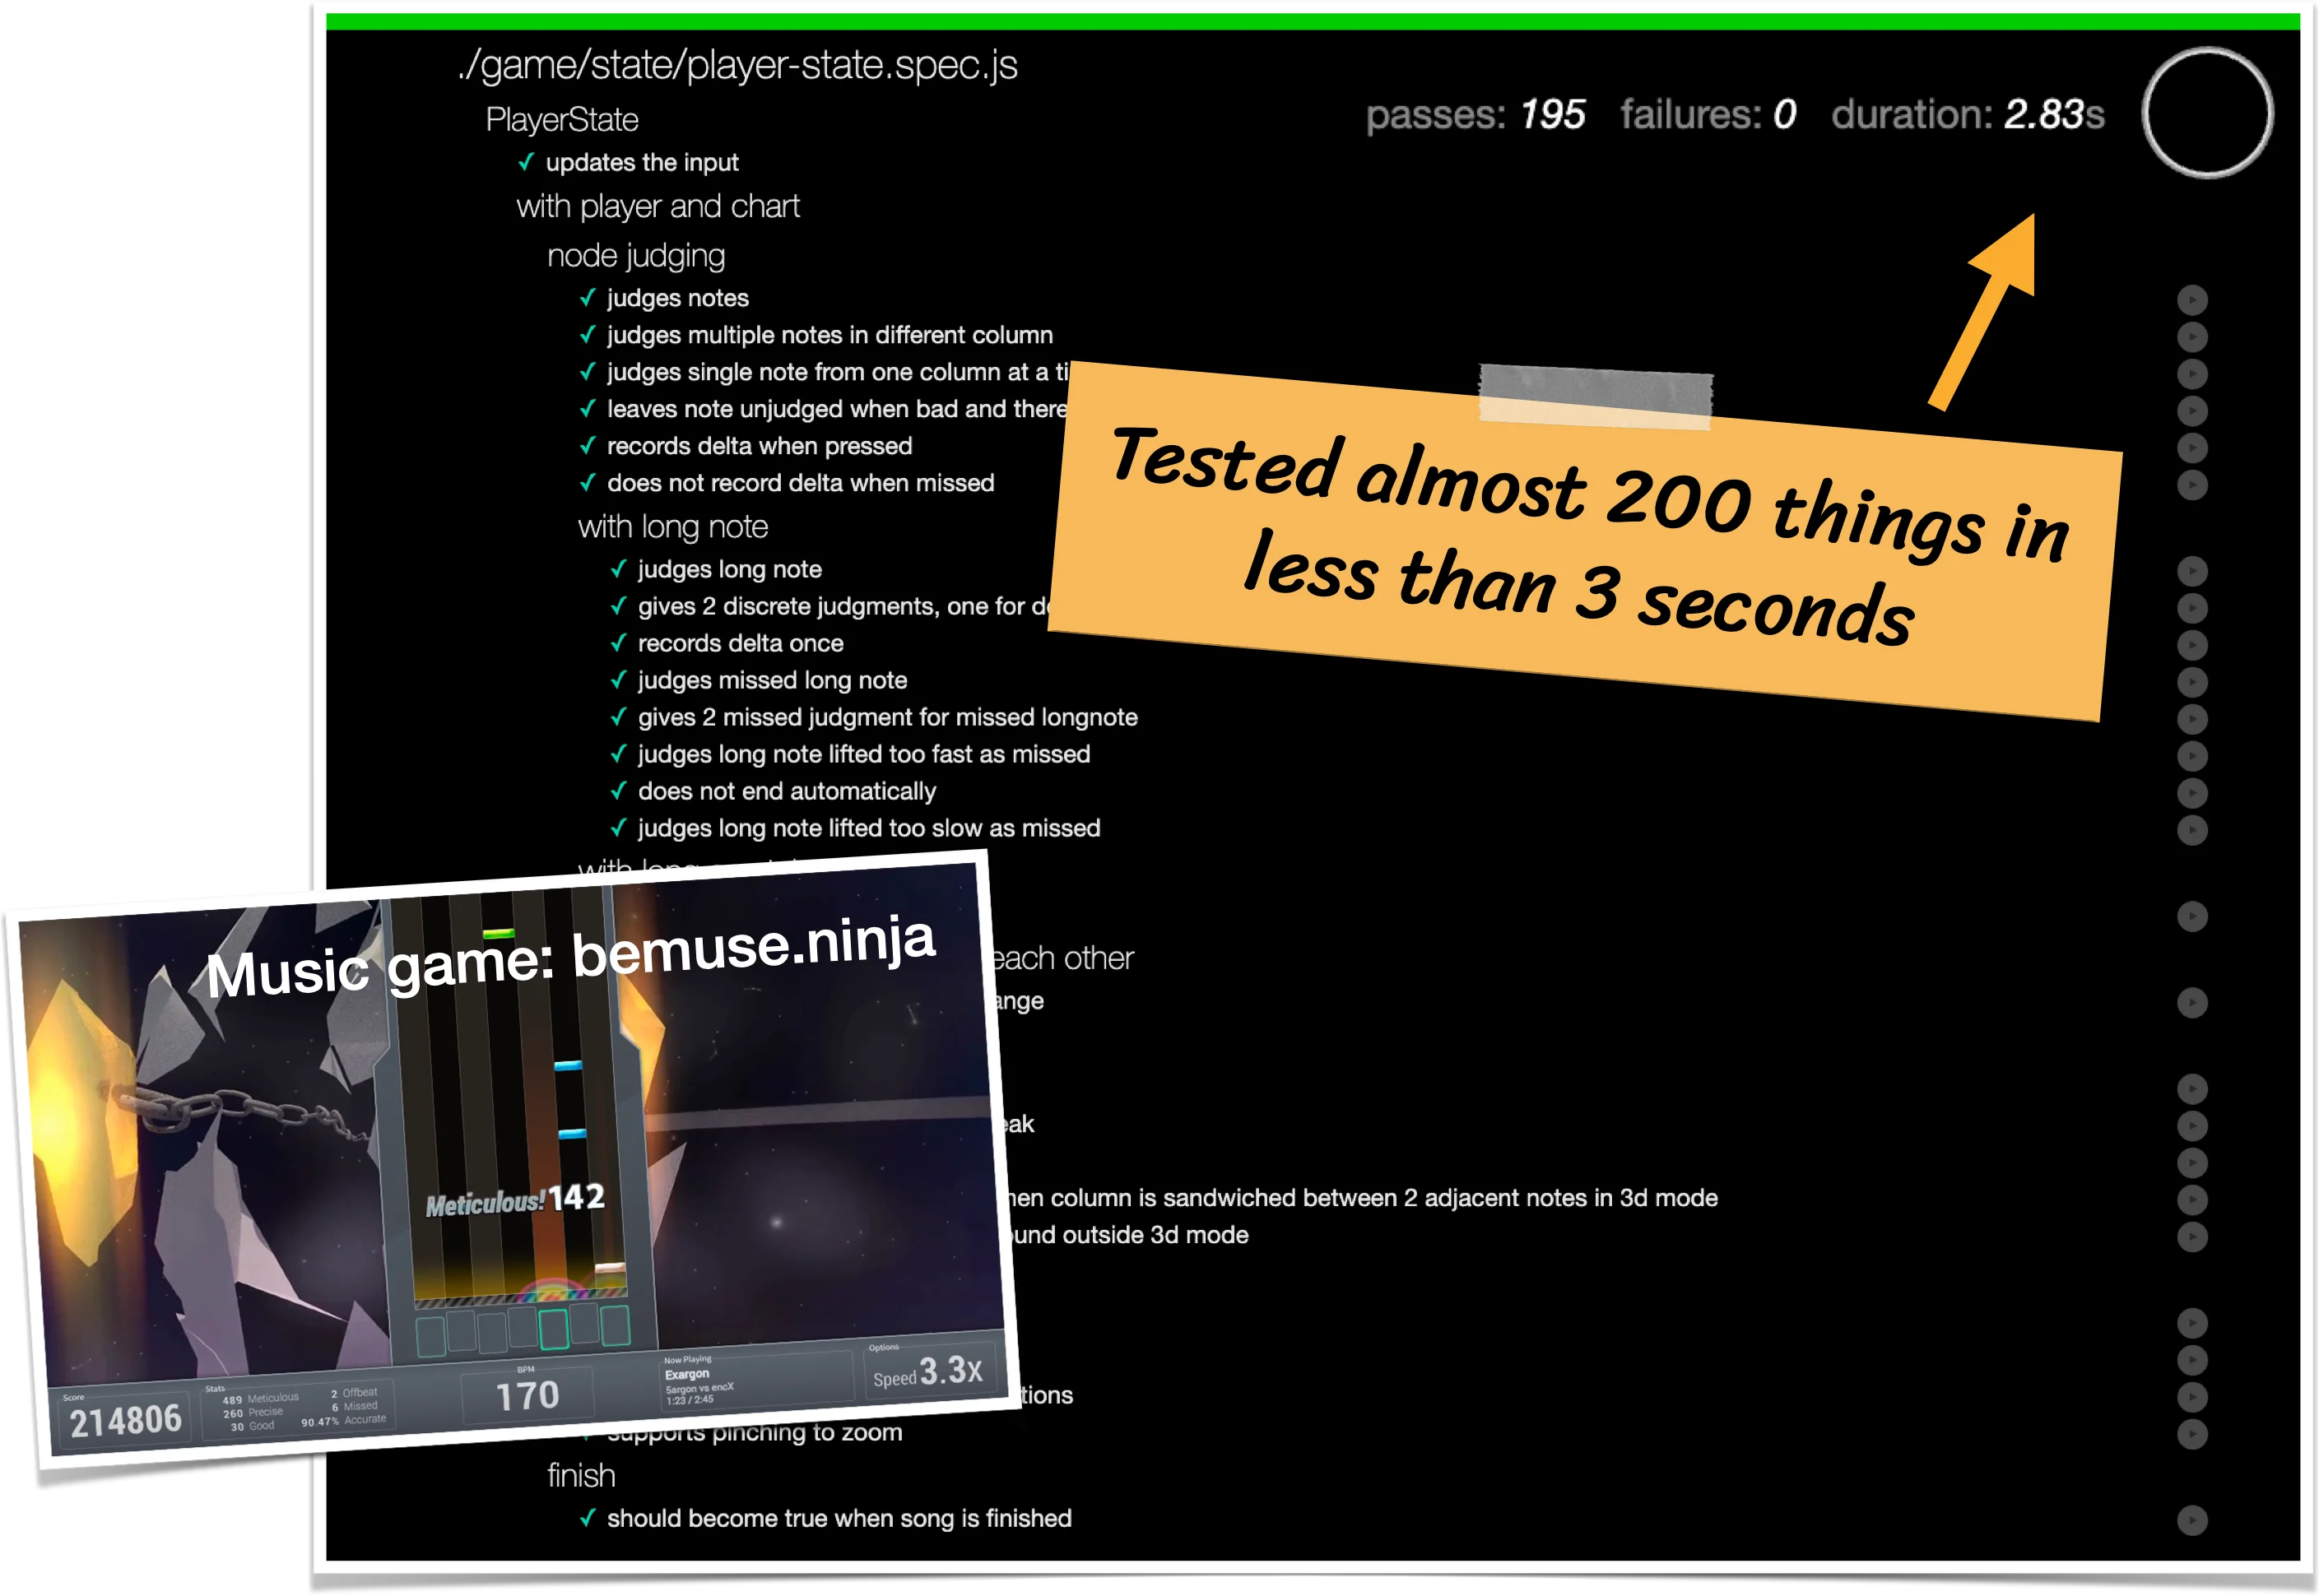
ทำให้เวลาผมแก้โค้ด กดเซฟ ผมรอให้เทสต์รันประมาณ 3 วินาที ผมก็ค่อนข้างมั่นใจได้แล้ว ว่าทุกอย่างน่ายังใช้งานได้เหมือนเดิม โดยไม่ต้องเสียเวลา 2–3 นาทีเพื่อเล่นเกมใหม่ทุกครั้งที่แก้โค้ดครับ